
Astrophotography Fundamentals: Resolution, Seeing, and Optical Limits (2026 Guide)
What really limits astrophoto sharpness — resolution, atmospheric seeing and your optics. Understand the real limits so you stop chasing impossible detail.
TL;DR — Astrophotography Fundamentals, Explained Simply
Astrophotography image quality is not determined by your camera or telescope alone. It is constrained by atmospheric seeing, optical resolution, pixel scale, and focus accuracy, all working together as a system. Understanding these fundamentals lets you plan smarter, focus better, and stop wasting money chasing “more gear” when physics is the real bottleneck.
Why Astrophotography Is Harder Than It Looks
Most beginners assume better images come from:
- more aperture
- longer focal length
- smaller pixels
That mindset fails fast.
Astrophotography lives at the intersection of physics, optics, and atmosphere. You are not imaging in a vacuum. You are imaging through turbulent air, imperfect glass, finite pixels, and limited focus tolerance.
Ignore those constraints, and no amount of premium hardware will save you.
Understand them, and even modest equipment can deliver exceptional results.
The Four Constraints That Actually Control Image Quality
Every astrophotography setup is governed by the same four limits. You can’t escape them — you can only balance them.
1. Angular Resolution (Optics)
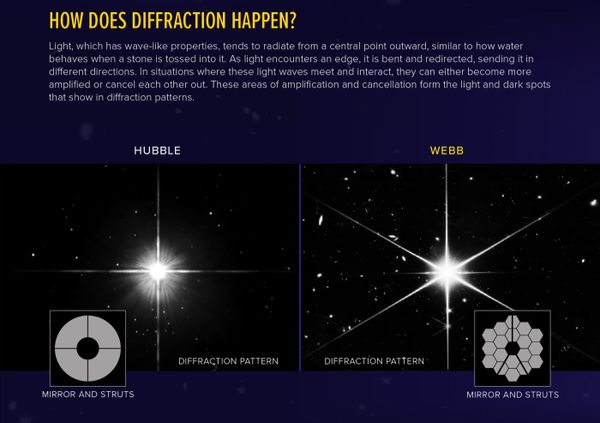
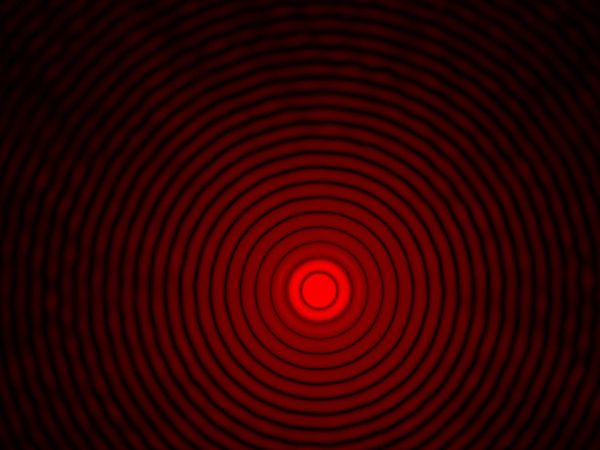
Angular resolution defines the smallest detail your optics could resolve under perfect conditions.
It depends on:
- aperture
- wavelength of light
- optical quality
In theory, larger apertures resolve finer detail.
In practice, this theoretical limit is almost never reached by amateurs.
Why? Because atmosphere intervenes first.
Two rules of thumb put a number on it. The Dawes limit estimates the finest star separation your optics can resolve as 116 ÷ aperture in millimetres, in arcseconds — so a 100 mm scope reaches about 1.16″ and a 200 mm scope about 0.58″. The slightly stricter Rayleigh criterion uses 138 ÷ aperture. Notice what is missing from both: focal length. Aperture alone sets the theoretical ceiling.
2. Atmospheric Seeing (The Real Boss)
Seeing describes how much Earth’s atmosphere blurs incoming starlight.
Typical amateur seeing:
- Excellent: ~1.5″
- Good: ~2.0″
- Average: ~2.5–3.0″
This means:
- If your seeing is 2.5″, you cannot resolve detail smaller than that, regardless of aperture.
Seeing is why:
- massive telescopes don’t magically outperform smaller ones
- longer focal length often hurts rather than helps
You don’t beat seeing. You design around it.
3. Sampling & Pixel Scale (Sensor Meets Sky)
Pixel scale defines how much sky each pixel records.
Measured in:
arcseconds per pixel (″/px)
Pixel scale links:
- focal length
- pixel size
- atmospheric seeing
This is where most setups go wrong.
If your pixel scale:
- is too fine, you oversample and waste signal
- is too coarse, you undersample and lose detail
The goal is not “small pixels.”
The goal is appropriate sampling for your seeing.
👉 This is why tools like a Pixel Scale Calculator matter more than brand comparisons.
The maths here is refreshingly simple: pixel scale (″/px) = 206.265 × pixel size (µm) ÷ focal length (mm). A 3.76 µm camera on a 480 mm scope works out to 206.265 × 3.76 ÷ 480 ≈ 1.6″/px. The usual target is to sample your seeing at roughly a third of its FWHM, so under 2.5″ skies you want something in the 0.8–1.3″/px range — anything much finer just oversamples turbulence.
4. Focus Tolerance (Critical Focus Zone)
Focus is not binary. It has tolerance.
The Critical Focus Zone (CFZ) defines how far the focuser can move before stars measurably degrade.
Modern CMOS sensors tightened this tolerance dramatically.
If your autofocus step size exceeds your true CFZ:
- autofocus “works”
- stars still bloat
- detail quietly disappears
This is why NCFZ (New Critical Focus Zone) is now the correct model for modern imaging systems.
Putting the Numbers Together: A Worked Example
Concepts click once you run a real rig through them. Take a popular beginner setup: an 80 mm f/6 apochromatic refractor (480 mm focal length) paired with a camera that has 3.76 µm pixels, imaging under average 2.5″ seeing.
Optical resolution: Dawes gives 116 ÷ 80 ≈ 1.45″ — the finest detail the glass could theoretically separate.
What the sky allows: seeing is 2.5″, which is coarser than 1.45″, so the atmosphere — not the telescope — is the real limit tonight. A larger aperture would not help you resolve more.
Pixel scale: 206.265 × 3.76 ÷ 480 ≈ 1.6″/px. Against 2.5″ seeing that sits right in the one-third-to-one-half sweet spot — well matched, neither badly over- nor undersampled.
The verdict: this modest rig is already well balanced for its conditions. Swapping to a 1500 mm f/10 SCT with the same camera would push pixel scale to about 0.5″/px — heavily oversampled for 2.5″ seeing, spreading the same real detail across more pixels and more noise without resolving anything new.
You can run these numbers for your own gear in seconds with our Field of View simulator and pixel-scale tools, and set your focus tolerance with the Critical Focus Zone calculator. For the focus side in depth, see our full guide to the New Critical Focus Zone (NCFZ).
How to Estimate Your Local Seeing
Because seeing sets your real ceiling, it is worth measuring rather than guessing. The most reliable method is to read the FWHM (full width at half maximum) of stars directly in your capture or analysis software — NINA, SharpCap, ASTAP and PixInsight all report it. Take the median FWHM over a clean subframe and read it in arcseconds; that number is your seeing for the night.
For a quick naked-eye check, look at a bright star near the zenith. Rock-steady points mean good seeing; visible boiling or rapid twinkling means the atmosphere is churning. Planets are an even better tell — if surface detail snaps in and out, seeing is poor and long focal lengths will struggle.
You can also plan ahead. Forecast tools such as Astrospheric and Clear Outside model jet-stream position and atmospheric stability, letting you save tight sampling and long focal lengths for the nights they will actually pay off.
How These Constraints Interact (The Part Most People Miss)
Astrophotography is not about optimizing one variable.
It’s about balancing a system.
Here’s how the interactions play out:
- Seeing limits usable resolution first
- Pixel scale must match seeing, not telescope marketing
- Focus tolerance shrinks as pixel scale tightens
- Oversampling magnifies focus errors and tracking errors
This explains why:
- longer focal length images often look worse
- smaller pixels don’t automatically add detail
- “perfect focus” is fleeting, not static
Understanding these interactions is the difference between engineering and guessing.
Oversampling vs Undersampling: What Actually Goes Wrong
Getting pixel scale wrong does not just waste resolution — it changes how your whole night performs. When you oversample (a pixel scale much finer than seeing needs), the light from each star spreads across more pixels than the detail warrants. The real detail does not increase, but the signal in each pixel drops, so your signal-to-noise ratio falls and you need longer total integration to reach the same smoothness. Worse, every tracking wobble and focus error is now magnified across those extra pixels, so stars bloat more readily.
Undersampling is the opposite trade-off. With a pixel scale coarser than your seeing, stars land on too few pixels and look blocky or square, and fine structure is lost because the sensor cannot record what it never sampled. The upside is higher signal per pixel and a wider field of view, which is why undersampled wide-field rigs still produce beautiful images — they are simply not the tool for tight galaxy detail.
The practical goal is to land near the middle: a pixel scale around one-third to one-half of your typical seeing FWHM. That is critically sampled for your conditions — capturing all the detail the atmosphere actually delivers without smearing it thin.
A Note on Binning
If you already own an oversampled setup, you do not have to buy new gear. Binning combines adjacent pixels into one larger effective pixel, coarsening your pixel scale and boosting signal-to-noise. On older CCDs this happened in hardware; on modern CMOS sensors it is usually done in software during processing, which recovers most of the signal benefit while letting you keep the native files. It is a simple lever for matching an oversampled rig to a night of mediocre seeing, and often a smarter first move than a hardware change.
The Tools That Remove Guesswork
Astrophotography fundamentals are math-driven — but you don’t need to do the math manually.
Use purpose-built tools to make informed decisions:
- Pixel Scale Calculator
Match your camera and telescope to your seeing - NCFZ Calculator
Set autofocus step size correctly for modern CMOS sensors - Seeing vs Sampling Calculator
Identify over- and undersampling instantly - Field of View Simulator
Plan framing before wasting clear nights
These tools turn theory into execution.
Common Misconceptions That Hold People Back
“More focal length means more detail”
Only if seeing allows it. Most of the time, it doesn’t.
“Smaller pixels are always better”
Smaller pixels oversample fast and demand tighter focus and tracking.
“Autofocus solves focus”
Autofocus only works if:
- step size matches CFZ
- temperature compensation is sane
- focus cadence respects seeing
“A bigger telescope fixes everything”
A bigger telescope magnifies all errors — including atmospheric ones.
Where Beginners Should Actually Focus First
If you’re new to astrophotography, prioritize this order:
- Understand your local seeing
- Match pixel scale to that seeing
- Set correct focus tolerance
- Plan framing intentionally
- Upgrade gear last, not first
This approach saves money, time, and frustration.
Frequently Asked Questions
What limits resolution in astrophotography — the telescope or the atmosphere?
Usually the atmosphere. A telescope's optical resolution (Dawes limit ≈ 116 ÷ aperture in mm) is often finer than typical seeing of 2–3 arcseconds, so on most nights the sky, not the scope, sets the real limit.
How do I calculate my pixel scale?
Pixel scale (″/px) = 206.265 × pixel size (µm) ÷ focal length (mm). A 3.76 µm camera at 480 mm focal length gives about 1.6 arcseconds per pixel.
What is a good pixel scale for deep-sky imaging?
Aim to sample your seeing at roughly one-third of its FWHM. Under typical 2–3″ seeing that means about 1–1.5″/px. Much finer oversamples the turbulence; much coarser throws away detail.
What is atmospheric seeing?
Seeing is the blurring of starlight caused by turbulence in Earth's atmosphere, measured as the FWHM of a star in arcseconds. Excellent nights are near 1.5″; average nights are 2.5–3″.
Does more focal length give more detail?
Only if seeing allows it. More focal length increases image scale, but if the atmosphere is already the limit you are simply magnifying blur — and demanding tighter focus and tracking to hold it.
Should I buy smaller pixels or a bigger telescope for more detail?
Often neither. Match your pixel scale to your seeing first. Smaller pixels oversample quickly and demand tighter focus; a bigger scope magnifies atmospheric error along with everything else.
How does focus tolerance relate to sampling?
The finer your pixel scale, the smaller your focus tolerance (the New Critical Focus Zone) becomes, because the sensor can now record defocus it used to hide. Fine sampling and loose focus do not coexist — if you oversample, you must also focus more precisely.
Can good processing fix poor seeing or sampling?
Only partially. Deconvolution and sharpening can recover some detail the atmosphere blurred, but they cannot invent detail that was never captured. Seeing-matched sampling and sharp focus at capture time always beat trying to rescue it later.
What is the single most important astrophotography fundamental?
If you internalise just one thing, make it this: match your pixel scale to your seeing before spending money on anything else. Nearly every “my images are not sharp” problem traces back to a sampling or focus mismatch, not a lack of aperture.
Next Steps: Go Deeper Where It Matters
Each of the topics below expands one fundamental in detail and connects directly to planning tools:
- Pixel Scale in Astrophotography
- Astronomical Seeing Explained
- Oversampling vs Undersampling
- Critical Focus Zone (CFZ vs NCFZ)
- Binning in Modern CMOS Imaging
- Field of View and Framing Strategy
Together, these form a complete foundation — not opinions, not hype, just physics applied to real imaging systems.
Written by